Miscellaneous Ramblings on Hacking

July 6, 2016

Shared Connection Info

Filed under: Uncategorized — Zack Bethem @ 8:44 pm

One of the common problems in a production environment relies on having a shared connection information between all of the scripts that operate in that environment. In searching for a solution, I developed the following approach for our maintenance scripts written in VBScript.

For all connection information, a common XML file is created that stores all connection information. This file is then protected using the appropriate controls within the operating system. The structure is similar to a App.config for Web.config file for most .Net solutions.

<?xml version="1.0">
<appSettings>
 <!-- db connection settings -->
 <rmdbconnection key="rmDbConnection" value="DSN=MART;UID=userDatabase;PWD=userPassword;" /> 
</appSettings>

Then, from the VB script, the database connection can be retrieved via the following function:

Function retrieveDBConnection( sPasswordFile, sNodeName )

 'parse dbpassword file and get connectivity info
 Set objXML = CreateObject("MSXML2.DOMDocument")
 objXML.Async = False
 objXML.Load(sPasswordFile)

 'find root node &lt;appSettings&gt;
 Set node = objXML.documentElement.selectSingleNode("/appSettings")

 ' check to see that the root node was found, if not throw a quit
 if node is nothing then
 WScript.Quit 1
 else
 for each xNode in node.childNodes
 if xNode.nodename = sNodeName then

 Dim atttr
 for each attr in xNode.attributes
 
 'cycling through each attribute name, find the 'value' attribute
 if attr.name = "value" then
 
 'return the found 'value' attribute
 retrieveDBConnection = attr.text 
 end if
 next
 end if
 next 
 end if

End Function

The above can then be called via the snippet:

'validate existence of password file
if filesys.FileExists(sPasswordFile) then
 WScript.Echo FormatDateTime(Now(),0) &amp; vbTab &amp;"Password file found, proceeding.."
 'parse dbpassword file and get connectivity info
 sODBC = retrieveDBConnection(sPasswordFile, "rmdbconnection" )
else
 WScript.Echo FormatDateTime(Now(),0) &amp; vbTab &amp;"Missing required password file for database connectivity."
 WScript.Quit 1
end if

December 7, 2015

VisualStudio shortcuts by version

Filed under: Uncategorized — Zack Bethem @ 2:20 am

Awesome sauce here.

http://visualstudioshortcuts.com/2013/

May 19, 2013

Querying SQL Server (and DB2) for table sizes

Filed under: Uncategorized — Zack Bethem @ 4:30 pm

Found this gem and I MUST save it for future reference.

http://www.mssqltips.com/tip.asp?tip=1177

For the DB2 equivalent:

select t.tabname, t.tabschema, type
, (DATA_OBJECT_P_SIZE + INDEX_OBJECT_P_SIZE + LONG_OBJECT_P_SIZE + LOB_OBJECT_P_SIZE + XML_OBJECT_P_SIZE)/1024 as TOTAL_SIZE_IN_MB
from syscat.tables as t, sysibmadm.admintabinfo as a
where t.tabname=a.tabname and t.tabname like 'UAC_%'
order by (DATA_OBJECT_P_SIZE + INDEX_OBJECT_P_SIZE + LONG_OBJECT_P_SIZE + LOB_OBJECT_P_SIZE + XML_OBJECT_P_SIZE) desc
fetch first 20 rows only

May 23, 2012

SVN version into your Assembly.cs file

Filed under: Uncategorized — Zack Bethem @ 8:10 pm

I wanted an incrementing Assembly version, but I didn’t want to have to do it manually. Some quick Googling and I found this nice solution:

I’ve been using SubWCRev that’s in the TortoiseSvn installation (I think it’s downloadable seperately too).
First i create a “template”-file for the AssemblyInfo.cs called AssemblyInfo.cs.in
This is created as a copy of the exisiting one.
Then replace the parts you want changed with SubWCRev placeholders like this:
[assembly: AssemblyVersion(“1.2.3.$WCREV$”)]
Then create a PreBuildEvent to run SubWCRev with appropriate parameters:
SubWCRev <wcpath> AssemblyInfo.cs.in AssemblyInfo.cs
Done.

So, this is translated as follows:

  • my AssemblyInfo template file AssemblyInfo.cs.in reads as follows:
// Version Notes:
// Updated to 2.0.0 for .net4 switch over
[assembly: AssemblyVersion("2.0.0.$WCREV$")]
[assembly: AssemblyFileVersion("2.0.0.$WCREV$")]


  • And I tweaked the PreBuildEvent in VisualStudio to use Macros.. it reads as follows:
subwcrev $(ProjectDir) $(ProjectDir)\Properties\AssemblyInfo.cs.in $(ProjectDir)\Properties\AssemblyInfo.cs


Fun stuff indeed.

May 9, 2012

Unica Customer Insight–Creating custom Bins

Filed under: Unica — Zack Bethem @ 4:05 pm

Unica’s Customer Insight product can quickly generate an EasySet of data allowing a user to start mining their customer base. The problem comes into play when the out of box configuration doesn’t match what you want to display.

By default, CustomerInsight will take all numeric data types from the source table and create “bins”. The “bins” created sometimes do not align with the desired buckets that a business may be accustomed to. Follow this process to create your own bins.

Scenario

We desire to set the bins for an attribute into 100 point increments to the following values:

  • 1 – 99
  • 100 – 199
  • 200 – 299
  • 300 – 399
  • 400 – 499
  • 900 – 1000

XML Modifications

File: cadimensions.xml

This file defines the bucket values that will be displayed. Within the existing <defaults><fields> tags, we will insert the following:

   1: <field name="ABILITY_TO_PAY">

   2:   <dimension name="ability_to_pay0" dimdisplay="Ability To Pay" singlefilterdisplay="Ability To Pay" multiplefilterdisplay="Ability To Pay" onlyincludedisplay="Ability To Pay" selectadisplay="%NTR_SELECTA_VALUE%" variable="ability_to_pay0code" filtertype="list" fill="true" keylookup="false" cgikey="abilitytopay0z">

   3:     <list source="self">

   4:       <item value="1" display="1 - 99" />

   5:       <item value="2" display="100 - 199" />

   6:       <item value="3" display="200 - 299" />

   7:       <item value="4" display="300 - 399" />

   8:       <item value="5" display="400 - 499" />

   9:       <item value="6" display="500 - 599" />

  10:       <item value="7" display="600 - 699" />

  11:       <item value="8" display="700 - 799" />

  12:       <item value="9" display="800 - 899" />

  13:       <item value="10" display="900 - 1000" />

  14:       <item value="11" display="0" />

  15:     </list>

  16:   </dimension>

  17: </field>

File: cavariables.xml

This file will create a variable for the translated codes. It defines the bins and maps those definitions back to the dimensions defined above. In the dimension definition above, note that we reference a variable ability_to_pay0code. This same variable name is used in the snippet below. The following would be inserted within the <defaults><fields> tags:

   1: <field name="ABILITY_TO_PAY">

   2:   <variable name="ability_to_pay0code">

   3:     <input type="db" entity="Fact1" element="ABILITY_TO_PAY">

   4:       <transformation type="intrange" destcolname="ability_to_pay0code" dbtype="int8">

   5:         <range start="1" end="99">1</range>

   6:         <range start="100" end="199">2</range>

   7:         <range start="200" end="299">3</range>

   8:         <range start="300" end="399">4</range>

   9:         <range start="400" end="499">5</range>

  10:         <range start="500" end="599">6</range>

  11:         <range start="600" end="699">7</range>

  12:         <range start="700" end="799">8</range>

  13:         <range start="800" end="899">9</range>

  14:         <range start="900" end="1000">10</range>

  15:         <range end="0">11</range>

  16:       </transformation>

  17:     </input>

  18:   </variable>

  19: </field>

File: caoutfmt.xml

This file defines the output format. Since we’ve modified the dimension and variables, the output format must also be defined. the following would be inserted within the <defaults><fields> tags:

   1: <field name="ABILITY_TO_PAY">

   2: <element name="ability_to_pay0" rowstoshow="10" showall="false" titleasc="Ability To Pay" titledsc="Ability To Pay">

   3:   <columns>

   4:     <column name="ability_to_pay0" type="listdimension" rankable="true" nowrap="true" trendable="true">

   5:       <header>Ability To Pay</header>

   6:       <format alignment="left" />

   7:       <exportfield>Ability To Pay</exportfield>

   8:       <datasettitle>Ability To Pay</datasettitle>

   9:     </column>

  10:   </columns>

  11:   <graph available="true">

  12:     <types>

  13:   <type default="true">bar</type>

  14:   <type>pie</type>

  15:   <type>line</type>

  16:     </types>

  17:   <crosstabtypes>

  18:     <crosstabtype>pathtab</crosstabtype>

  19:     <crosstabtype>barscape</crosstabtype>

  20:     <crosstabtype>barstacked</crosstabtype>

  21:   </crosstabtypes>

  22:   </graph>

  23: </element>

  24: field>

September 27, 2011

Getting Started: Unica Marketing Operations’ Custom Triggers

Filed under: Uncategorized — Zack Bethem @ 2:52 pm

You have the SDK. You have the JavaDocs. There are samples, but how does it all glue together? This post is all about writing your first UMO custom trigger. These triggers help to automate tasks or enforce business rules within UMO.

What you Need?

A few needed items:

  • Unica Marketing Operations (UMO) environment
  • Eclipse IDE for EE
  • Associated JARs: affinium_plan.jar, log4j.jar

The JARs are best grabbed from the UMO environment.

Start Eclipse & Code

Startup Eclipse and create a new Application Client Project. This project template option is available under the Java EE folder.

Capture2

Set the JDK to the same level as the web application server that UMO is deployed on. I selected 5.0 for JDK 1.5.

Here I define my AutoReviewerAssignment class. All triggers are required to implement the IProcedure interface.

   1:  

   2: public class AutoReviewerAssignment implements IProcedure {

   3:  

   4:     // The Name and Description of this Procedure.

   5:     private static final String name           = "AutoReviewerAssignment";

   6:     private static final String desc           = "Provides automatic assignment of reviewers based on project member assignment";

   7:     private static final PluginVersion pv        = new PluginVersion(1, 0, 0); 

   8:       

   9:     // Constants

  10:     private static final String DEBUG          = "debug";

  11:     private static final int    STATUS_SUCCESS = 0;

  12:     private static final int    STATUS_FAILED  = -1;

  13:     

Unica products use Log4J for all system logging. There are a couple of products in the Unica suite that don’t, but it’s a safe bet that log4j is being used. For UMO, it is. I’m getting the logger and setting it to a static variable. This way I can add my own class’ log entries to the main log file.

   1: //added - latch on to the log4j logger

   2:     private static final Logger _LOG = Logger.getLogger(AutoReviewerAssignment.class);

   3:     

The interface defines some standard methods, the first of importance is the initialize() method. This is your time to grab some site specific parameters. In some cases, I’ve grabbed from a standard Java .properties file. But Unica also provides the ability to define these parameters in the actual procedure definition file  where the procedure is declared (more on this later).

   1: public void initialize(Map initParams) throws PluginInitializationException {

   2:         // TODO Auto-generated method stub

   3:         _LOG.info("Initializing class trigger procedure..");

   4:         

   5:         //only expecting one init parameter

   6:         if(initParams.containsKey(DEBUG))

   7:         {

   8:             try{

   9:                 isDebug = ((Boolean) initParams.get(DEBUG)).booleanValue();

  10:                 _LOG.debug("Debug mode is enabled: " + String.valueOf(isDebug));

  11:             } catch(Exception e)

  12:             {

  13:                 _LOG.fatal("Exception in initialization. "+ e.getMessage());

  14:                 throw new ProcedureInitializationException("Problem using init parameter: DEBUG");

  15:             }

  16:         }

  17:     }

Finally, there’s the execute method. This is where the action happens and is unique to your own implementation goals.

Configuration Deployment

Once compiled, it’s time to migrate the compiled class file for your procedure. Here’s the steps:

  • Review the [PLAN_HOME]\conf\plan_config.xml to ascertain the environment’s configuration. We’re looking for the following UAPInitParams: integrationProcedureDefinitionPath and integrationProcedureClasspathURL
  • integrationProcedureDefinitionPath points to a procedure_plugins.xml file. This file defines the class, including the initialization parameters. Here’s an example:
   1: <procedure>

   2:     <key>POCtest</key>

   3:     <class-name>com.amberleaf.procedure.POCtest</class-name>

   4:     <init-parameters>

   5:     <init-parameter>

   6:       <param-name>debug</param-name>

   7:       <param-type>java.lang.Boolean</param-type>

   8:             <param-value>true</param-value>

   9:     </init-parameter>

  10:     </init-parameters>

  11: </procedure>

  • integrationProcedureClasspathURL points to the directory where the resulting class file should be placed
  • Finally, bounce the web application server so that the new class can be cached

Now that the environment is setup, it’s time to define the actual trigger. This defines when the trigger should actually fire within Unica Marketing Operations. To do this, we go to: Settings > Marketing Operations Settings > Trigger Bindings.

  • Click ‘Add New Trigger Binding’
  • Define the trigger with the appropriate attributes:

Capture

For example, my trigger would be limited to the ‘Project’ marketing object. The trigger would be limited to the context of ‘People’. Put another way, the trigger would be limited to the ‘People’ tab under the ‘Project’ object. I then further limit the trigger to only execute on the ‘Updated’ event. In summary, the trigger will fire when the ‘People’ tab of a ‘Project’ is ‘Updated’.

And there you have it. You’ve created your first trigger. A special note here. Since we latched on to the log4j logger of Unica’s, we will see our logging entries in the Unica Marketing Operation’s system log. Just be sure to set your log4j logging level appropriately.

March 3, 2011

Best Summary for String.Format Ever

Filed under: Uncategorized — Zack Bethem @ 3:20 am

Perfect.

http://www.csharp-examples.net/string-format-datetime/

September 3, 2010

Unica Monitoring SQL

Filed under: Unica — Zack Bethem @ 11:43 pm

Doing some Unica troubleshooting today and wrote this little SQL gem. It’s a basic query that does a fine job of retrieving run log errors for flowchart runs. I figure it could come in handy as an Administrator asking the question:

What are my most common errors and where should I focus my troubleshooting?

The SQL:

select to_char(r.runstarttime,'yyyy-mm-dd') runday
, c.name campaign, f.name flowchart
, substr(rr.resultxml,instr(rr.resultxml,'<Process>')+9, instr(rr.resultxml,'<RunStatusCode>')-(instr(rr.resultxml,'<Process>')+9)) as process_name
, substr(rr.resultxml,instr(rr.resultxml,'<ErrorMessage>')+14, instr(rr.resultxml,'</ErrorMessage>')-(instr(rr.resultxml,'<ErrorMessage>')+14)) as result_error
, count(*)
from uacsys.ua_ccrunlog r
join uacsys.ua_runresult rr on r.runid=rr.runid
join uacsys.ua_flowchart f on r.flowchartid=f.flowchartid
join uacsys.ua_campaign c on f.campaignid=c.campaignid
where r.runstatus = 'Run Failed'
and r.runstarttime >to_date('2010-08-01','yyyy-mm-dd')
and instr(rr.resultxml,'<ErrorMessage>') &gt; 0
group by to_char(r.runstarttime,'yyyy-mm-dd')
, c.name, f.name
, substr(rr.resultxml,instr(rr.resultxml,'<Process>')+9, instr(rr.resultxml,'<RunStatusCode>')-(instr(rr.resultxml,'<Process>')+9))
, substr(rr.resultxml,instr(rr.resultxml,'<ErrorMessage>')+14, instr(rr.resultxml,'</ErrorMessage>')-(instr(rr.resultxml,'<ErrorMessage>')+14))
order by runday desc


This in turn creates some nice little results for analysis:

July 30, 2010

Unica Interact via SOAP – How To

Filed under: .Net, Unica — Zack Bethem @ 9:50 pm

Background

Unica Interact extends Unica’s Campaign Suite for real-time offer management. If you want a full background of what it can offer, I’d suggest a read from Unica’s site. Here I’ll be discussing how to get started for some real basic integration. First, what you’ll need:

  • Unica’s v7 demo image or access to a Unica Interact implementation
  • Visual Studio 2008 (C# Express should work)

Interact Setup

When using the VMWare demo image provided, most of this is setup as part of the image. As an overview, however, I’ll review the following steps:

  1. Interactive Channel
  2. Session
  3. Assigned Campaign Offers and Ratings

Interactive Channel – Insurance

I’ll be using the already defined interactive channel Insurance. This is part of the Unica v7 demo image available to their partners. This interactive channel represents a website for an Insurance company and is defined with two zones, each with a single interaction point. One for home page landings, which would be the assumed landing page a user would see. Second, a signup page where a user would sign in based on existing credentials and/or register for first time use.

image

Interactive Session

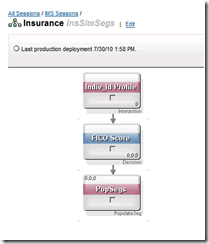
From within the Interactive Channel summary tab, click on the related session Insurance. This will show the interactive session and its associated flowchart into focus for review.

image

Reviewing the associated flowchart, we see a simple segmentation of the incoming individual based on their related FICO score. Examining the process box FICO Score, the segmentation is as follows:

Low FICO Score Score < 200
Med FICO Score 200 < Score < 400
High FICO Score Score > 400

image

Lastly, examining the interaction process box Indiv_Id Profile the expected meta data for a session is shown along with the expected Audience. This will come into play later when the API initiates an interact session. For now, note that the audience level is Individual and the associated key is Indiv_Id. Also note the Score attribute in the record’s metadata used above for segmentation purposes.
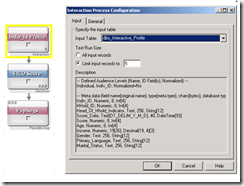
image

Interactive Campaign

The last piece of the Interact puzzle is the associated interact campaign. Here is where the associated offers are defined by segment. I won’t go into the specifics as there is a complete User’s Guide for that, but here is where we can rank our offers. Note that some of the offers listed have expired, which is why they will not be shown later during the coding exercise. Also note that we have some offers tied directly to a given zone and that the offers have an associated ranking for presentation purposes.
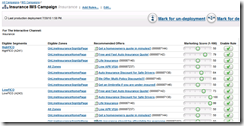
image

Visual Studio Setup

With the review of the interact setup out of the way, it’s time prepare the VS environment for some coding. I’m using C# for this exercise which will limit me to using SOAP. Unica warns that the best performance is achieved using their interact_client.jar, but 1) I’m playing and 2) I’m not concerned with performance right now and 3) C# and .jar wouldn’t work to well and 4) I like C# more that I like java.

Import the WSDL

The WSDL for Interact can be found under:

<Affinium_Home>\Interact\conf\InteractService.wsdl

Be sure to use the file from your installation as a version incompatibility could exist!

Once you have the WSDL downloaded, you can build a DLL out of it by doing the following steps:

  1. As administrator, open a Visual Studio command prompt. This is different from just a normal DOS prompt as it has environment settings. The link is in the start menu under the Visual Studio 2008 folder.
  2. Using the wsdl.exe utility, generate a C# Class
    wsdl /l:CS /protocol:SOAP \InteractService.wsdl
  3. Compile the proxy class as a DLL
    csc /t:library /r:System.Web.Services.dll /r:System.Xml.dll InteractService.cs

Visual Studio C# Console Program

Add a InteractService.DLL Reference

Create a new C# Console program. Once the project structure is created, we’ll reference the DLL that was compiled from above. Once does this by Right-Clicking on the Reference folder in the Solution Explorer window and opting for Add Reference..

image

Build a Helper Class

I created a helper class in my code. The class is basic as potatoes, but it allows for the quick definition of NameValuePairs. These name-value pairs are important as they define the session’s record structure. Recall I mentioned that earlier in reviewing the session’s metadata.

    class InteractHelper
    {
        public NameValuePairImpl defineParm(string parmName, int valNumeric)
        {
            NameValuePairImpl parm = new NameValuePairImpl();
            parm.name = parmName;
            parm.valueAsNumeric = valNumeric;
            parm.valueDataType = "numeric";
            return parm;
        }
        public NameValuePairImpl defineParm(string parmName, string valString)
        {
            NameValuePairImpl parm = new NameValuePairImpl();
            parm.name = parmName;
            parm.valueAsString = valString;
            parm.valueDataType = "string";
            return parm;
        }
        public NameValuePairImpl defineParm(string parmName, DateTime valDate)
        {
            NameValuePairImpl parm = new NameValuePairImpl();
            parm.name = parmName;
            parm.valueAsDate = valDate;
            parm.valueDataType = "datetime";
            return parm;
        }
    }

Note in the code that there are three defined valueDataTypes for the NameValue pairs. These are:

  1. numeric
  2. string
  3. datetime

Build Console Main()

Keep in mind that this is just a glorified HelloWorld program with the intention to get you started. That being said, the bulk of the code is just thrown into the Main method in the Console Program’s class. Computer Science geeks can check their attitude at the door.

class Program
    {
        static void Main(string[] args)
        {

            InteractService _svc = new InteractService();
            //define the URI for the interact service listening for requests
            _svc.Url = "http://localhost:7001/interact/services/InteractService";

            //this will validate that we connect successfully upon receiving a version
            //number from the service
            getVersionResponse rVersion = _svc.getVersion();

            //setup the name-value pair(s) specifying the audience
            NameValuePairImpl IndivId = new NameValuePairImpl();
            IndivId.name = "Indiv_Id";
            IndivId.valueAsNumeric = 948;
            IndivId.valueDataType = "numeric";
            NameValuePairImpl[] initAudience = { IndivId };

            //setup the expected record structure for the session
            //these values don't have to have values, but the structure must
            //be defined!
            List<NameValuePairImpl> parmList = new List<NameValuePairImpl>();
            InteractHelper hlpr = new InteractHelper();
            parmList.Add(hlpr.defineParm("Score", 250));
            parmList.Add(hlpr.defineParm("HHold_Id", 372));
            parmList.Add(hlpr.defineParm("Head_Of_Hhold", "1"));
            parmList.Add(hlpr.defineParm("Score_Date", DateTime.Now));
            parmList.Add(hlpr.defineParm("Score", 300));
            parmList.Add(hlpr.defineParm("Age",30));
            parmList.Add(hlpr.defineParm("Income",35000));
            parmList.Add(hlpr.defineParm("Gender","M"));
            parmList.Add(hlpr.defineParm("Primary_Language","English"));
            parmList.Add(hlpr.defineParm("Marital_Status", "Single"));
            NameValuePairImpl[] sessionParms = parmList.ToArray();

            //start the interact session
            Response r = _svc.startSession("123456", false, true, "Insurance", initAudience, "Individual",
                sessionParms);

            //get available offers for the session
            Response rOffersAvail = _svc.getOffers(r.sessionID, "OnLineInsuranceHomePage", 5);

            //end the program
            Console.WriteLine("Done");
        }
    }

Summary

There are a few things that are important to review. These are represented in the images below.

First, the record structure defined within the Interact session should be in sync with the name-value pair array submitted when initiating an Interact session. This is shown in the image below while using my helper class for defining the Name-Value pair array.

Second, the offers received as part of the session match against the offer rules defined as part of the campaign for the given interaction zone. All offer rules from other campaigns are applied, such as expiration dates rendering an offer invalid. In the example below, I’m showing the program running in debug mode while watching variable assignment. Note that two offers are returned when making the getOffers() request for an individual with a FICO of 300 (aka. segment=MedFICO). The offers suggested are both active across all zones. The other two defined across the zones have both reached their expiration date. As a result, they are not returned.

And that is it. If you haven’t fallen asleep by now, congrats you made it. Hope it helps as you learn Interact. There are some tricky bits that make the getting started process bumpy. This post with the code samples should help you get going faster.

July 9, 2010

Pimp your Eclipse!

Filed under: Uncategorized — Zack Bethem @ 6:30 pm

Props to the dark theme creator for a better looking Eclipse.

http://blog.prabir.me/post/Dark-Eclipse-Theme.aspx

Older Posts »

Create a free website or blog at WordPress.com.